User Rights Management
Overview
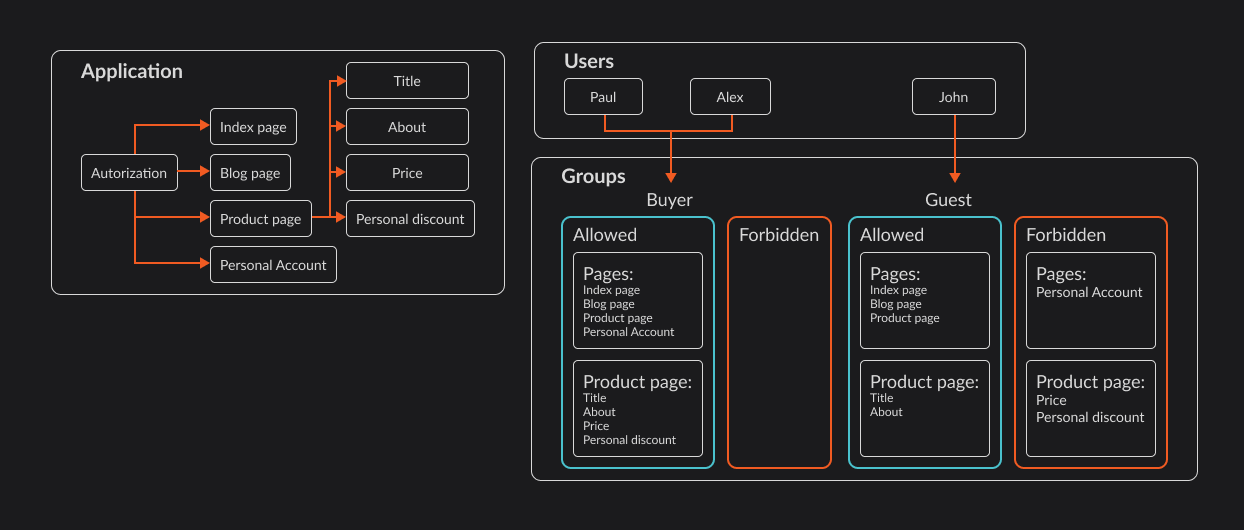
The user access management system is designed for detailed control over who has access to which application resources. The system uses a role-based access control (RBAC) model, where users are assigned to groups, and access rights are granted to these groups. This ensures effective and secure access management.
Group Management
Creating a New Group
- Navigate to the Groups section:
- Open the
Groupstab.
- Open the
- Add a group:
- Click the
Create Groupbutton. - Specify a descriptive name and a tag.
- Assign initial access rights.
- Click the
A Guest group with a default set of restrictions is always created in a new project.
Inheriting Access Rights
In the "Groups" tab, previously created groups are presented in a hierarchical view, and the newly created group can be connected to an already existing group to inherit rights from the parent group.
If there is a restriction in the path in the parent group, and the same restriction is overwritten in the child group, the final restriction will be that of the child group, but only if the parent group does not have the "Final Permission" option specified.
A group can only be specified if neither a parent nor a child group has already been selected.
Modifying Access Rights
The "Permissions" tab is key for editing access rights.
If you previously specified a parent group for inheriting rights, all information about the established accesses will be placed in the table above, and editing inherited rights is prohibited. Rights that include exceptions and unused rights are grouped separately in the same table.
Access Rights Management
Creating and Editing Access Rights
To start creating a right, click the "Create Right" button in the "Permissions" tab.
An access right consists of a combination of a method and a path.
- Create a Minimal Set of Permissions:
- This option allows you to minimize the task of creating rights by generating the minimally required set of permissions.
Available only if there are no previously established permissions in the group.
- Set Data Output Restrictions:
- This option is applicable only when "Create a Minimal Set of Permissions" is selected, setting a restriction on data output.
The number of records is set in the settings.
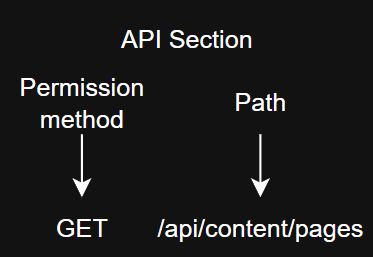
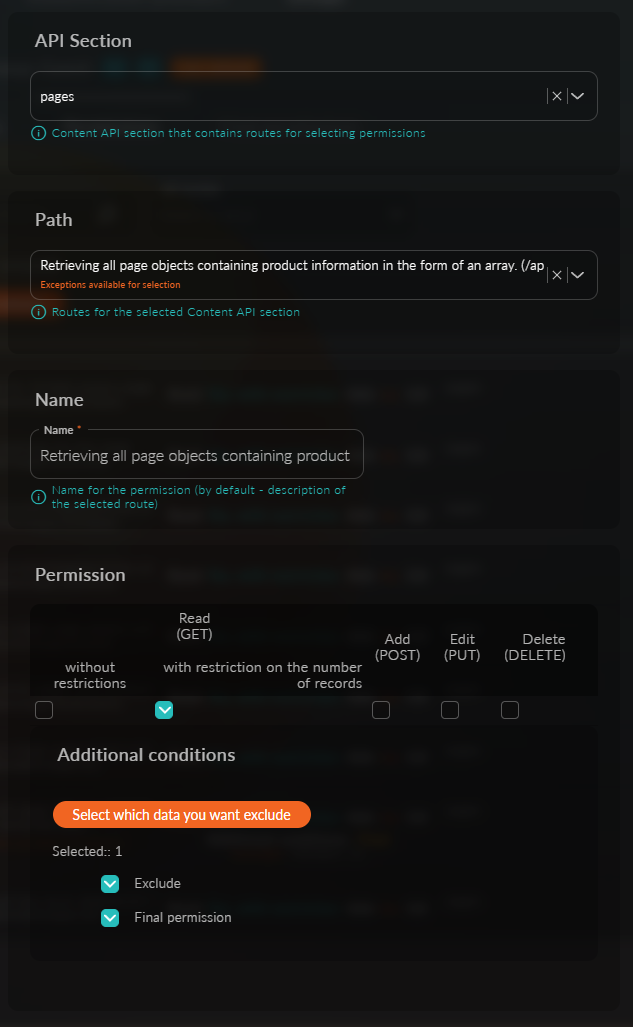
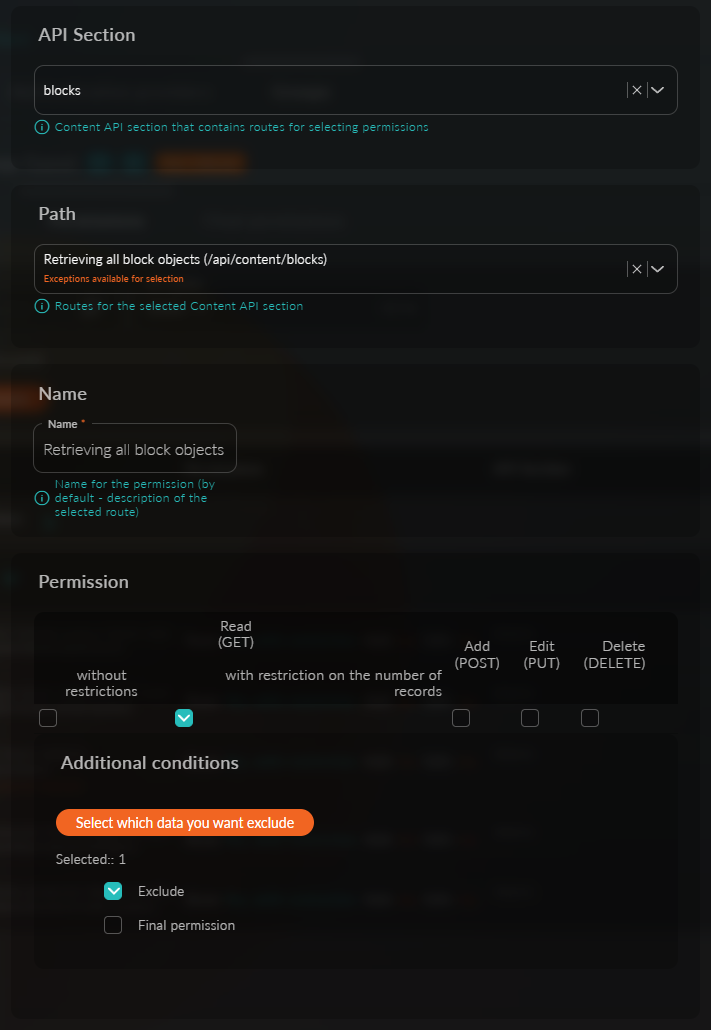
- API Section:
- A required parameter when creating new access, specifies the route for selecting permissions.
- Path:
- Selection is available only after selecting the API section, clarifying the route for setting rights.
- Name:
- A mandatory field for naming the right.
- "Permissions" Table:
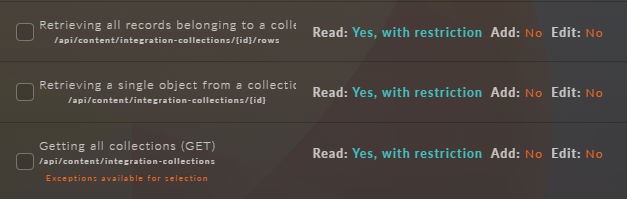
- The table presents a selection of HTTP methods for the specified path, indicating options for "no restrictions" and "with record count restrictions".
For any path in the table, there are always 4 methods listed: GET, POST, PUT, DELETE.
-
Additional Conditions These conditions appear not for all paths, but only for "list" paths and allow you to set exceptions for the retrieved documents.
- For example, if you need to grant permission for all pages but make an exception, you can click the button "Select which data you want to exclude." In the opened additional window, you can select the data to which access should be restricted.
Let's consider a few examples of setting restrictions to implement the task: You need to restrict the permission of the "Guest" group to the "Personal Account" page and to the attributes "Price" and "Personal Discount."
Example 1 - Restricting Guest Group Access to Specific Pages.
To implement this, you need to open the "Guest" group in edit mode. Next, open the "Permissions" tab and find "Retrieve all page objects containing product information as an array" in the table of created permissions.
warningThis access exists by default in the "Guest" group; if it is not in your group, you need to create new access. To do this, click the "Create Access" button, and in the modal window, select the following parameters: API section - pages Path - "Retrieve all page objects containing product information as an array."
Next, specify "No Restrictions." And open the list of pages you want to restrict; for this, you need to click the button "Select which data you need." Specify the restriction for the "Personal Account" page.
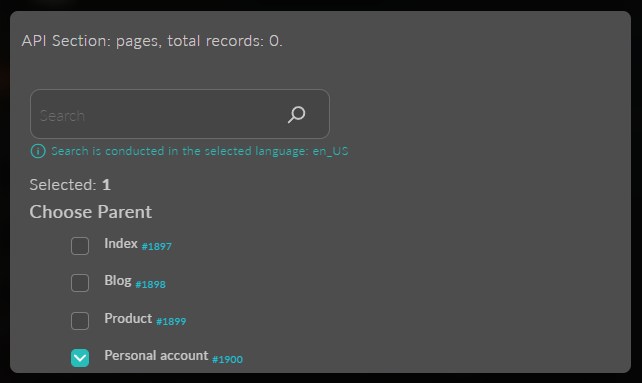
Don't forget, after selecting the pages, to specify the "Exclude" option and "Final Permission" if necessary, if rights can be inherited.
Here is how the entire setup should look:
This completes the access setup; after clicking the "Save" button, all unauthorized users will receive only 3 pages instead of four.
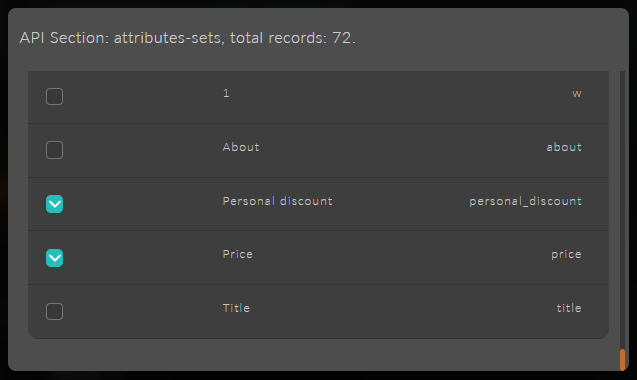
Example 2 - Restricting Guest Group Access to Specific Attributes.
To implement this, you need to open the "Guest" group in edit mode. Next, open the "Permissions" tab and find "Retrieve all attributes with data from the attribute set" in the table of created permissions.
warningThis access exists by default in the "Guest" group; if it is not in your group, you need to create new access. To do this, click the "Create Access" button, and in the modal window, select the following parameters: API section - attributes-sets Path - "Retrieve all attributes with data from the attribute set."
Next, specify "No Restrictions." And open the list of pages you want to restrict; for this, you need to click the button "Select which data you need." Specify the restriction for the attributes "Price" and "Personal Discount."
warningHere you can see the list of all created attributes from all attribute sets.
Don't forget, after selecting the pages, to specify the "Exclude" option and "Final Permission" if necessary, if rights can be inherited.
Here is how the entire setup should look:
This completes the access setup; after clicking the "Save" button, all unauthorized users will receive limited information when requesting product information.
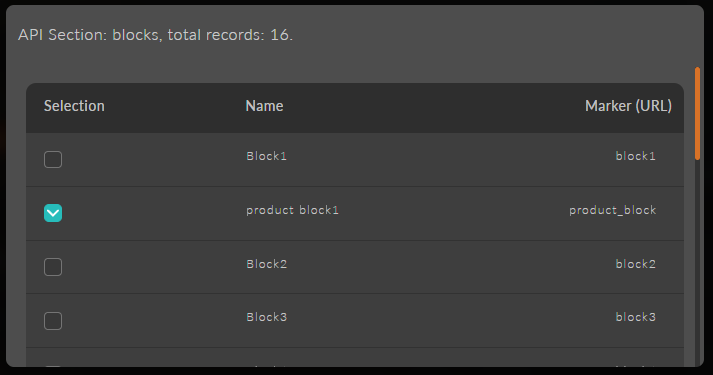
Example 3 - Restricting Guest Group Access to Blocks.
To implement this, you need to open the "Guest" group in edit mode. Next, open the "Permissions" tab and find "Retrieve all block objects" in the table of created permissions.
warningThis access exists by default in the "Guest" group; if it is not in your group, you need to create new access. To do this, click the "Create Access" button, and in the modal window, select the following parameters: API section - blocks Path - "Retrieve all block objects."
Next, specify "No Restrictions." And open the list of blocks you want to restrict; for this, you need to click the button "Select which data you need."
warningHere you can see the list of all created blocks from all block groups.
Don't forget, after selecting the block, to specify the "Exclude" option and "Final Permission" if necessary, if rights can be inherited.
Here is how the entire setup should look:
This completes the access setup for blocks.
– Retrieve all user objects – administrators. – Retrieve all objects from attribute sets. – Retrieve all attributes with data from the attribute set. – Retrieve all page objects containing product information as an array. – Retrieve all block objects. – Retrieve all form objects. – Return all product subscriptions. – Retrieve all objects from the order repository. – Search for all objects with product status. – Retrieve all template objects filtered by types. – Retrieve all template preview objects. – Get all collections.
After selecting data for exclusion, two new options will appear: "Exclude" - this option indicates that the selected data should be excluded. "Final Right" - this right is not inherited throughout the entire child group chain (this option becomes available only if the "Exclude" option is selected).
The selection of additional conditions depends on the chosen path and is not always available. When such a choice is available, it is marked with a marker - "Exceptions available for selection."
By default, new rights go to the "Unused Rights" section; to activate them, simply select them by clicking the checkbox to the left of the name.
To open the editor, use the button 
To delete, use 
Understanding Access Rights
Access rights are detailed settings that define what actions a group can perform with specific resources. They are organized by API sections and can be further refined using conditions.
Searching for Rights in the Table
Searching for the required rights in the table is done by entering text in the "Search Rights" field, selecting the necessary API sections in the selector, and choosing the "Select Unused" option.
Final Rights
The final rights tab is an informative table filtered by API sections to simplify the search.