Node admin-api
The admin-api node provides direct access to the internal OneEntry API. It allows you to read and modify orders, pages, users, collections, and payment sessions directly from the integration flow—without manually writing HTTP requests.
Settings for the admin-api node
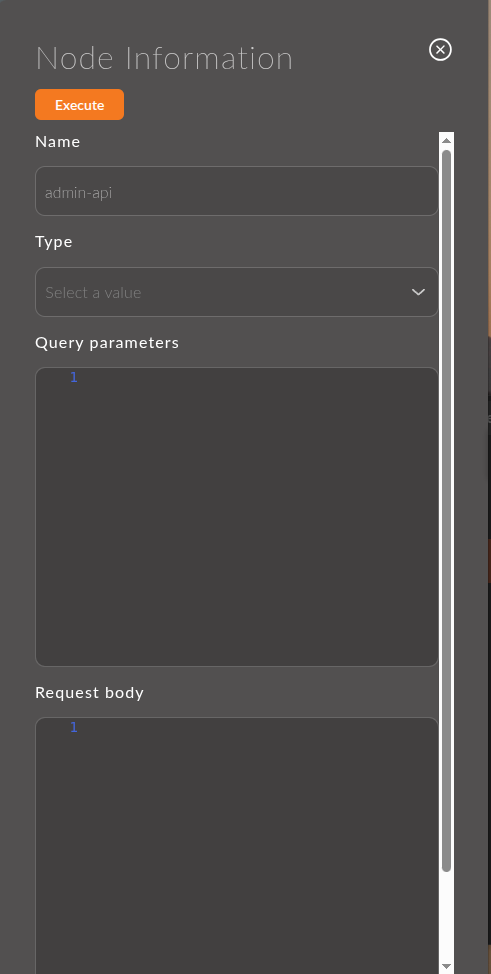
1. Name
A field for specifying the name of the node.
The name is displayed in the workspace and helps easily identify the node.
If left empty, the node will be called admin-api.
Example:
- Node name:
Create Payment Session
2. Type
Selection of the API method that will be called when a message passes through the node. Available methods:
- "Update page object" — Update page object
- "Search all objects on product pages with pagination for the selected category" — Search for products with pagination
- "Changing the status of the product page" — Change the status of the product page
- "Product page update" — Update product page
- "User object update - admin" — Update user object (by admin)
- "Update one user object" — Update one user object
- "Updating the value of one entity attribute" — Update the value of an entity attribute
- "Receiving all orders belonging to the order storage object" — Retrieve all orders from the storage
- "Updating the status of an order belonging to the order storage object" — Update the status of an order
- "Payment session update" — Update payment session
- "Receiving one payment session object by its identifier" — Retrieve payment session by ID
- "Creating a payment session" — Create a payment session
- "Receiving all records belonging to the collection" — Retrieve collection records
- "Creating a record in the collection" — Create a record in the collection
- "Changing a record in the collection" — Modify a record in the collection
- "Deleting an object from the collection record" — Delete an object from the collection record
3. Query parameters
URL request parameters. The field uses Mustache syntax—values from msg can be inserted using {{variable}}.
Example (for the method "Receiving all records belonging to the collection"):
{
  "entityType": "orders",
  "entityId": "{{orderId}}",
  "langCode": "en_US",
  "offset": 0,
  "limit": 1,
  "marker": "delivery"
}
4. Request body
The request body in JSON format. Supports Mustache for data substitution from msg.
Example (for the method "Creating a payment session"):
{
  "orderId": {{orderId}},
  "type": "session"
}
5. Input Schema
The Input Schema block is displayed in the node settings and shows the structure of the data coming from the previous node in the flow. The schema is presented as pairs of "key - type," taking into account the nesting of objects.
If the schema fields are described in Swagger, textual descriptions are displayed next to them. These descriptions are also picked up by the code editor (Monaco) as hints when writing Mustache templates.
Example of Input Schema display:
payload
  └── order
        ├── id           (integer)  — Order identifier
        ├── status       (string)   — Current status
        └── totalPrice   (number)   — Total amount
6. Execute Button
The Execute button allows you to call the API request directly from the node editing form without running the entire flow.
How it works:
- The server executes the entire flow from the beginning to this node, passing data along the chain according to the last published state of the flow.
- If any
functionnode along the way does not pass data further but has the Output Example (JSON) field filled, that data is used as mock data. - In the case of a successful response, the API response is passed to the next node as a schema.
- If the request returns an error, the schema is not passed to the next node.
Before using the Execute button, ensure that the flow is published. The server executes the chain based on the last publish state.
Impact on the schema:
The admin-api node initially has a response schema from Swagger. When the Execute button is pressed, the schema is overwritten with the actual response from the API. Fields that match the Swagger description retain their textual descriptions.
7. Automatic invocation of read-only requests
All admin-api nodes that perform read-only requests (GET) are automatically invoked:
- when the Integrations page is opened,
- when the flow is updated via the Publish button.
This ensures that the data schema in the next node is always up to date without manual triggering.
Usage Examples
Example 1: Creating a payment session
Node settings:
- Type:
Creating a payment session - Request body:
{
  "orderId": {{orderEvent.order.id}},
  "type": "session"
}
Result:
The node creates a payment session using the orderId from the incoming message and passes the new session data to the next node.
Example 2: Updating the status of an order
Node settings:
- Type:
Updating the status of an order belonging to the order storage object - Query parameters:
{
  "id": {{orderId}}
} - Request body:
{
  "status": "{{newStatus}}"
}
Result:
The node updates the order status using data from the incoming message.
Example 3: Retrieving collection records
Node settings:
- Type:
Receiving all records belonging to the collection - Query parameters:
{
  "entityType": "delivery",
  "entityId": "{{payload.id}}",
  "langCode": "en_US",
  "offset": 0,
  "limit": 10
}
Result:
The node returns a list of collection records. Since this is a read-only request, the response schema is automatically loaded when the page is opened.